

How to Remove the Rear Bumper
By: BlueSolrac
(Note: This How-to is intended for 2003-2005 models only.)
![Image]()
Before you begin it is recommended that you read through all the steps.
Removing the rear bumper is actually easier and faster than the front bumper, however it requires removing the tail-lights. It should take somewhere between 20-30 minutes to completely take off. Before you actually start removing the bumper you need to get your tools ready.
![Image]()
Tools and Supplies
- Philips and Flathead Screwdriver
- Needle Nose Pliers
- 10mm Wrench
- Soft towel or something to rest bumper on
- 5/16 in. Wrench or Short Philips Screwdriver (Recommended)
- Plastic Bag (Recommended)
- Jack and Jackstands (Recommended)
Now we can begin…
Step 1: Be sure that your e-brake is engaged and jack up the rear end of the car. Place your jackstands. (Note: This step is not required, but you will need to remove a few fasteners and screws later on which will be easier if you jack up your car.)
Step 2: Open the trunk and hood, then disconnect the negative battery cable. If your trunk is full of items it would make things easier to remove the items or at least push them as far back as possible.
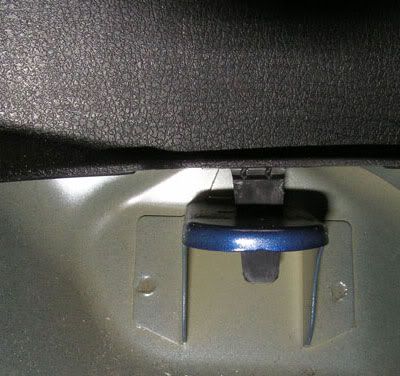
Step 3: You will need to remove the tail-lights. To access the back of the tail-light you will need to pull back the trunk carpeting on each side. However there is a black plastic piece that is holding back the carpeting. It is attached by four plastic fasteners, two on each side.
![Image]()
Using a flathead screwdriver remove the four fasteners and place them inside of the plastic bag (these fasteners are very easy to lose in the trunk.) The plastic is still held on by two tabs which need to be aligned straight. Pull upwards and then out to remove.
![Image]()
![Image]()
Step 4: Pull back the trunk carpeting behind the tail-light. Remove the two bolts shown using the 10mm wrench.
![Image]()
The tail-light must then be carefully pulled/slid outwards. Notice how the end of the tail-light is attached in the picture below. Remove the two plugs attached to the tail-light using the needle nose pliers and place the tail-lights in a safe place.
![Image]()
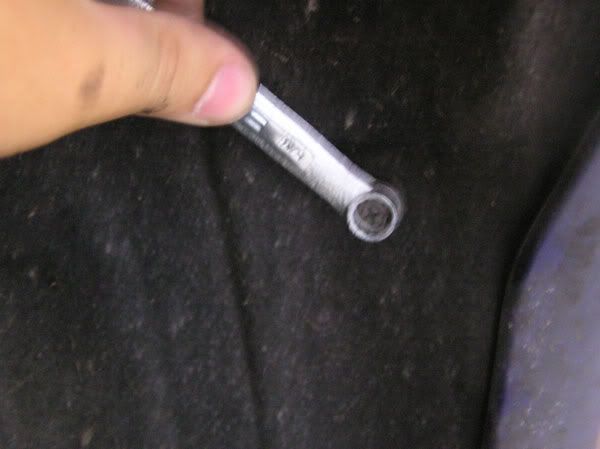
Step 5: Now head to the rear wheels and look at the fender liner. Look for two screws directly behind the wheels and remove them. I could not fit a standard Philips screwdriver in without removing the wheel (a short one might fit.) Instead I used a 5/16 in. wrench to remove the screws with ease.
![Image]()
![Image]()
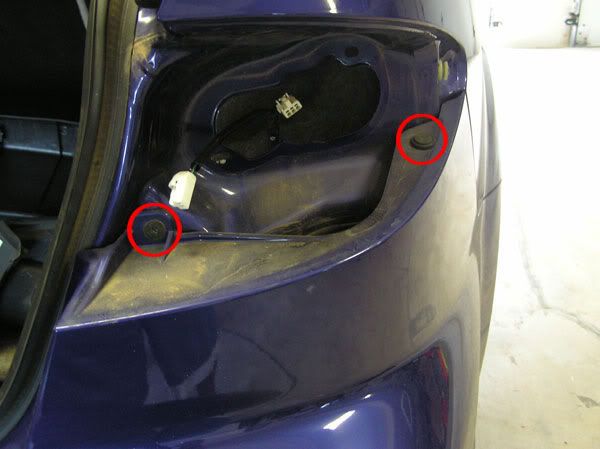
Step 6: Follow the same rear fender liner down beneath the car and look for two more plastic screws and remove them.
![Image]()
Continued in post below...
By: BlueSolrac
(Note: This How-to is intended for 2003-2005 models only.)

Before you begin it is recommended that you read through all the steps.
Removing the rear bumper is actually easier and faster than the front bumper, however it requires removing the tail-lights. It should take somewhere between 20-30 minutes to completely take off. Before you actually start removing the bumper you need to get your tools ready.

Tools and Supplies
- Philips and Flathead Screwdriver
- Needle Nose Pliers
- 10mm Wrench
- Soft towel or something to rest bumper on
- 5/16 in. Wrench or Short Philips Screwdriver (Recommended)
- Plastic Bag (Recommended)
- Jack and Jackstands (Recommended)
Now we can begin…
Step 1: Be sure that your e-brake is engaged and jack up the rear end of the car. Place your jackstands. (Note: This step is not required, but you will need to remove a few fasteners and screws later on which will be easier if you jack up your car.)
Step 2: Open the trunk and hood, then disconnect the negative battery cable. If your trunk is full of items it would make things easier to remove the items or at least push them as far back as possible.
Step 3: You will need to remove the tail-lights. To access the back of the tail-light you will need to pull back the trunk carpeting on each side. However there is a black plastic piece that is holding back the carpeting. It is attached by four plastic fasteners, two on each side.

Using a flathead screwdriver remove the four fasteners and place them inside of the plastic bag (these fasteners are very easy to lose in the trunk.) The plastic is still held on by two tabs which need to be aligned straight. Pull upwards and then out to remove.

Step 4: Pull back the trunk carpeting behind the tail-light. Remove the two bolts shown using the 10mm wrench.

The tail-light must then be carefully pulled/slid outwards. Notice how the end of the tail-light is attached in the picture below. Remove the two plugs attached to the tail-light using the needle nose pliers and place the tail-lights in a safe place.

Step 5: Now head to the rear wheels and look at the fender liner. Look for two screws directly behind the wheels and remove them. I could not fit a standard Philips screwdriver in without removing the wheel (a short one might fit.) Instead I used a 5/16 in. wrench to remove the screws with ease.

Step 6: Follow the same rear fender liner down beneath the car and look for two more plastic screws and remove them.

Continued in post below...


")


